DIY Privacy Fence
Pools are really AWESOME to have in Arizona. But the pool equipment, while it is necessary for a clean pool, it isn’t the prettiest thing to look at. So I decided to hide mine with a DIY Modern Privacy Fence. This fence not only hides the ugly pool equipment, but it also adds some fun character to my backyard. Let me show you how I made it.
This post IS sponsored by Simpson Strong-Tie. All opinions are my own. The post DOES contain affiliate links. For more information on my affiliate programs, see my DISCLOSURES page.

BEFORE
NOTE: Before any project where you will be digging, be sure to call your local 811 to have them come out and mark where your utility lines are. They will mark them in different color spray paint and give you an approximate depth of the water, electric, gas, etc.

Call 811 and have utility lines marked before digging!
Then stake out where you want your fence. I used some landscape stakes and these steel form stakes along with this construction twine. The metal stakes have been great because they have holes in them where you can put a nail through and the easily wrap the twine tight.

Roughly laying out the fence so we can dig the post holes.
To ensure your corners are square or 90 degrees I used the 5-4-3 method. Basically I lay the string lines out to where I think they look square then measure from the corner down one way 3 feet and 4 feet on the other line. Then if when you measure from those two marks across you get 5 feet you know that your corner is square!
I originally was going to just have the fence in an L-shape around the pool equipment, but last minute I decided to angle the last section so that it leaves a walkway to what eventually will lead to our greenhouse! I’ll show you how I accomplish the angle in a little bit.
Watch me build my DIY Privacy Fence here!
Now that you have your layout it is time to dig your post holes. I am using 4x4 posts, so you want your hole to be about 3x the width of your post or about 12” in this case. As far as depth, you want it to be at least 1/3 of the height that will be outside the dirt. Mine was 54” H outside the dirt, so technically I only needed them 18” deep. But we did end up making them about 20-24”. The depth can vary depending on where you live and the frostline, so be sure to check with your local digging authority… whatever that is!

Our ground is rocking so used a breaker bar to loosen the rocks.

And then a post hole shovel to remove the dirt.

Added rocks at the bottom of each hole to level the posts and for drainage.
There are lots of ways to build a fence and most people probably would leave the posts long and cut them after installation so that they only have to worry about making sure they are inline and not inline and level when setting them. But we decided to cut them before…. for some reason it seemed easier to us.

I tried to get Oscar to move so many times, but he refused and got sawdust all over himself.
So with the length in the ground and the height outside they were 78”. We then added gravel to the bottom of the 3 of the holes that were in a line to level them. And we checked level by securing a 2x4 to the tops of them and using a four foot level to check til we had them just right.

Posts in ground, now to level.

Added hardware to the top to secure a 2x4 to the posts and level them to each other.

Staked and all ready for concrete.
When we had them where we wanted them we attached some scrap wood and stakes to the posts to hold them into place. And then I checked plumb about 1000 times.

I think I checked if the posts were plumb like a 1000 times!
Then to set the posts in the ground we used some fast-setting concrete mix. I decided to use this mix because you don’t have to mix it before putting it in the hole. You just dump the concrete in the hole til it is level with the ground and then add about 1 gallon of water per bag of concrete! That is easy!

Time starts now with the fast setting concrete.

Mix with rebar to get water to the bottom of hole.

Add a little concrete mix to the top to absorb any water.
Well… not totally. We did use a piece of rebar to make holes in the concrete and kind of mix it and allow the water to get to the bottom of the holes. You have to work fast because the concrete is definitely fast setting!
Then the next day I ended up setting the other two posts by myself… just add gravel, attach 2x4 to the top of two posts, level, secure posts plumb, add concrete to hole, add water, mix and that’s it!
For the the angled hole, I did the same thing and adding the 2x4 to the tops of the posts ensured that my angle was correct… not protractors or nothing!
Now that the posts are set… we get to make this fence AWESOME!
First step to awesome was to paint the posts and cross slat 2x4’s black. I used the color Tricorn Black from Sherwin Williams in an Outdoor Matte Behr paint.

Since I was using hardware for the fence slats painting before was a smart move.
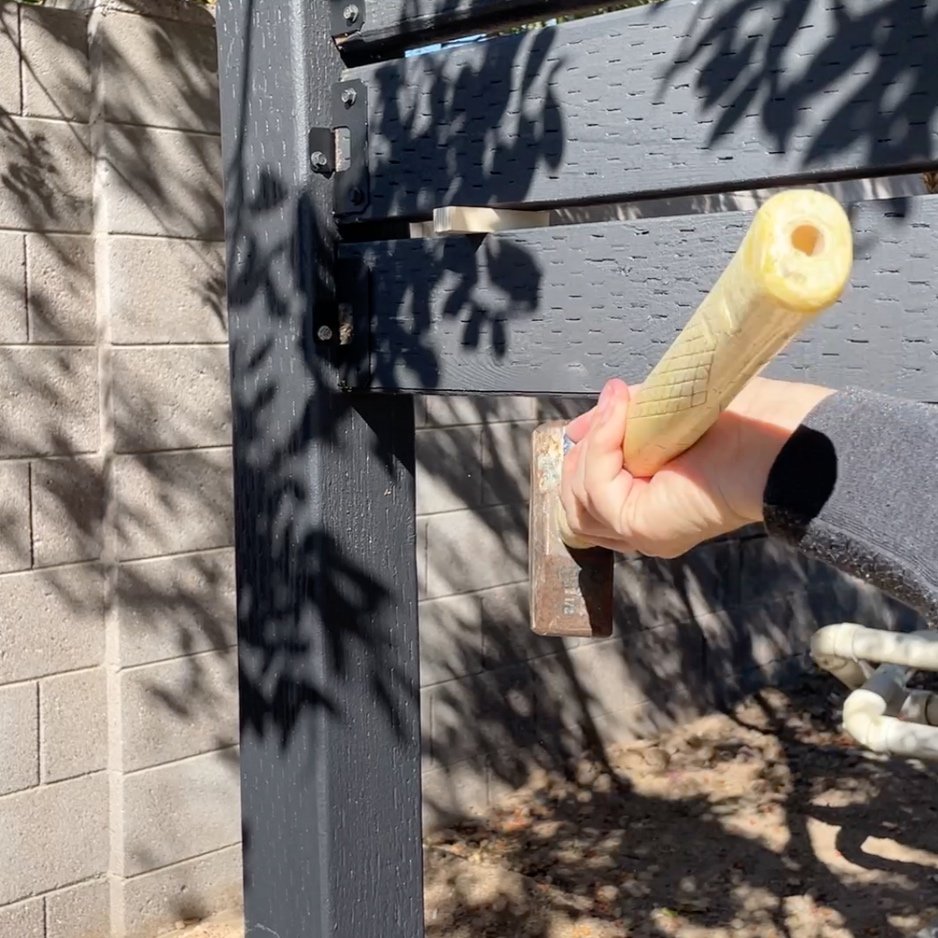
And for the hardware I used Simpson Strong-Tie’s Outdoor Accent Black Power Coated Ridge Tie Connectors or APRTR. You can only get these online, but to have them already black and with the extra protection of being power coated makes it a no brainer.

Simpson Strong-Ties APRTR black powder coated Ridge Tie Connectors… sold online only.
To secure the brackets to the 4x4 posts, I used Simpson Strong-Ties Outdoor Accent 1 1/2” connectors screws that also come black. These you can find in stores. To install them I cut a few spacer blocks and a little jig that help me offset the bracket a 1/4” from the side of the 4x4 posts, so the slats would be centered.

Simpson Strong-Ties 1 1/2” Outdoor Accent Connector Screws… sold in stores and online.

My not so fancy jigs to help me space the connectors just right for installation.
So install a bracket, cut a 2x4 to length, install with a 1/2” spacer block between slats and then screw into place. And repeat! Seriously so easy!

My wheelbarrow became my workstation… move concrete bags, stored tools and acted as sawhorses.
Used 1/2” spacer block to keep gaps consistent.

I am loving the installed look! Simpson Strong-Ties APRTR connectors.

Last time to see this ugly pool equipment.
For the angled section of the fencing I found another Simpson Strong-Tie bracket that worked perfect. I used their LS30 skewbable connectors and attached one side of the connector to a 2x4 the same height as the post using those same 1 1/4” connector screws for the APRTR’s. Then I used some 2 1/2” connector screws and attached the other side of the LS30 brackets to the 4x4 post.


Ready to bend to the correct angle.
So 2x4 is attached to the post, but not at the right angle. So with the LS30’s you can actually bend them or skew them from 0 to 130 degrees. So with the 2x4 still on top of the post that I used to level them I used it as a guide on how far to bend the connectors. Not sure if this is what they are meant for, but it worked awesomely. And then you add the APRTR brackets on the 2x4 and install the slats like the other sections… problem solved!

I think I can I think I can….

PONY clamps for a little extra help.

Double checking if the angle is correct.
Then once I had all the slats installed I added a top cap or 2x4 to the top of the posts. I did this because I liked the look and because it would add an extra layer of protection from water getting into the top of the posts. Oh… speaking of posts… I did go back and mound the concrete at the base of each post. I did this so that when it rains the water will run away from the posts and not right to them, thus increasing their life.

Used some 2 1/2” deck screws I had on hand to screw the top cap.

I mitered the corner.

The top cap with add protection and looks to the fence.
Then all that was left was some touch up painting and moving the dirt and landscaping back!
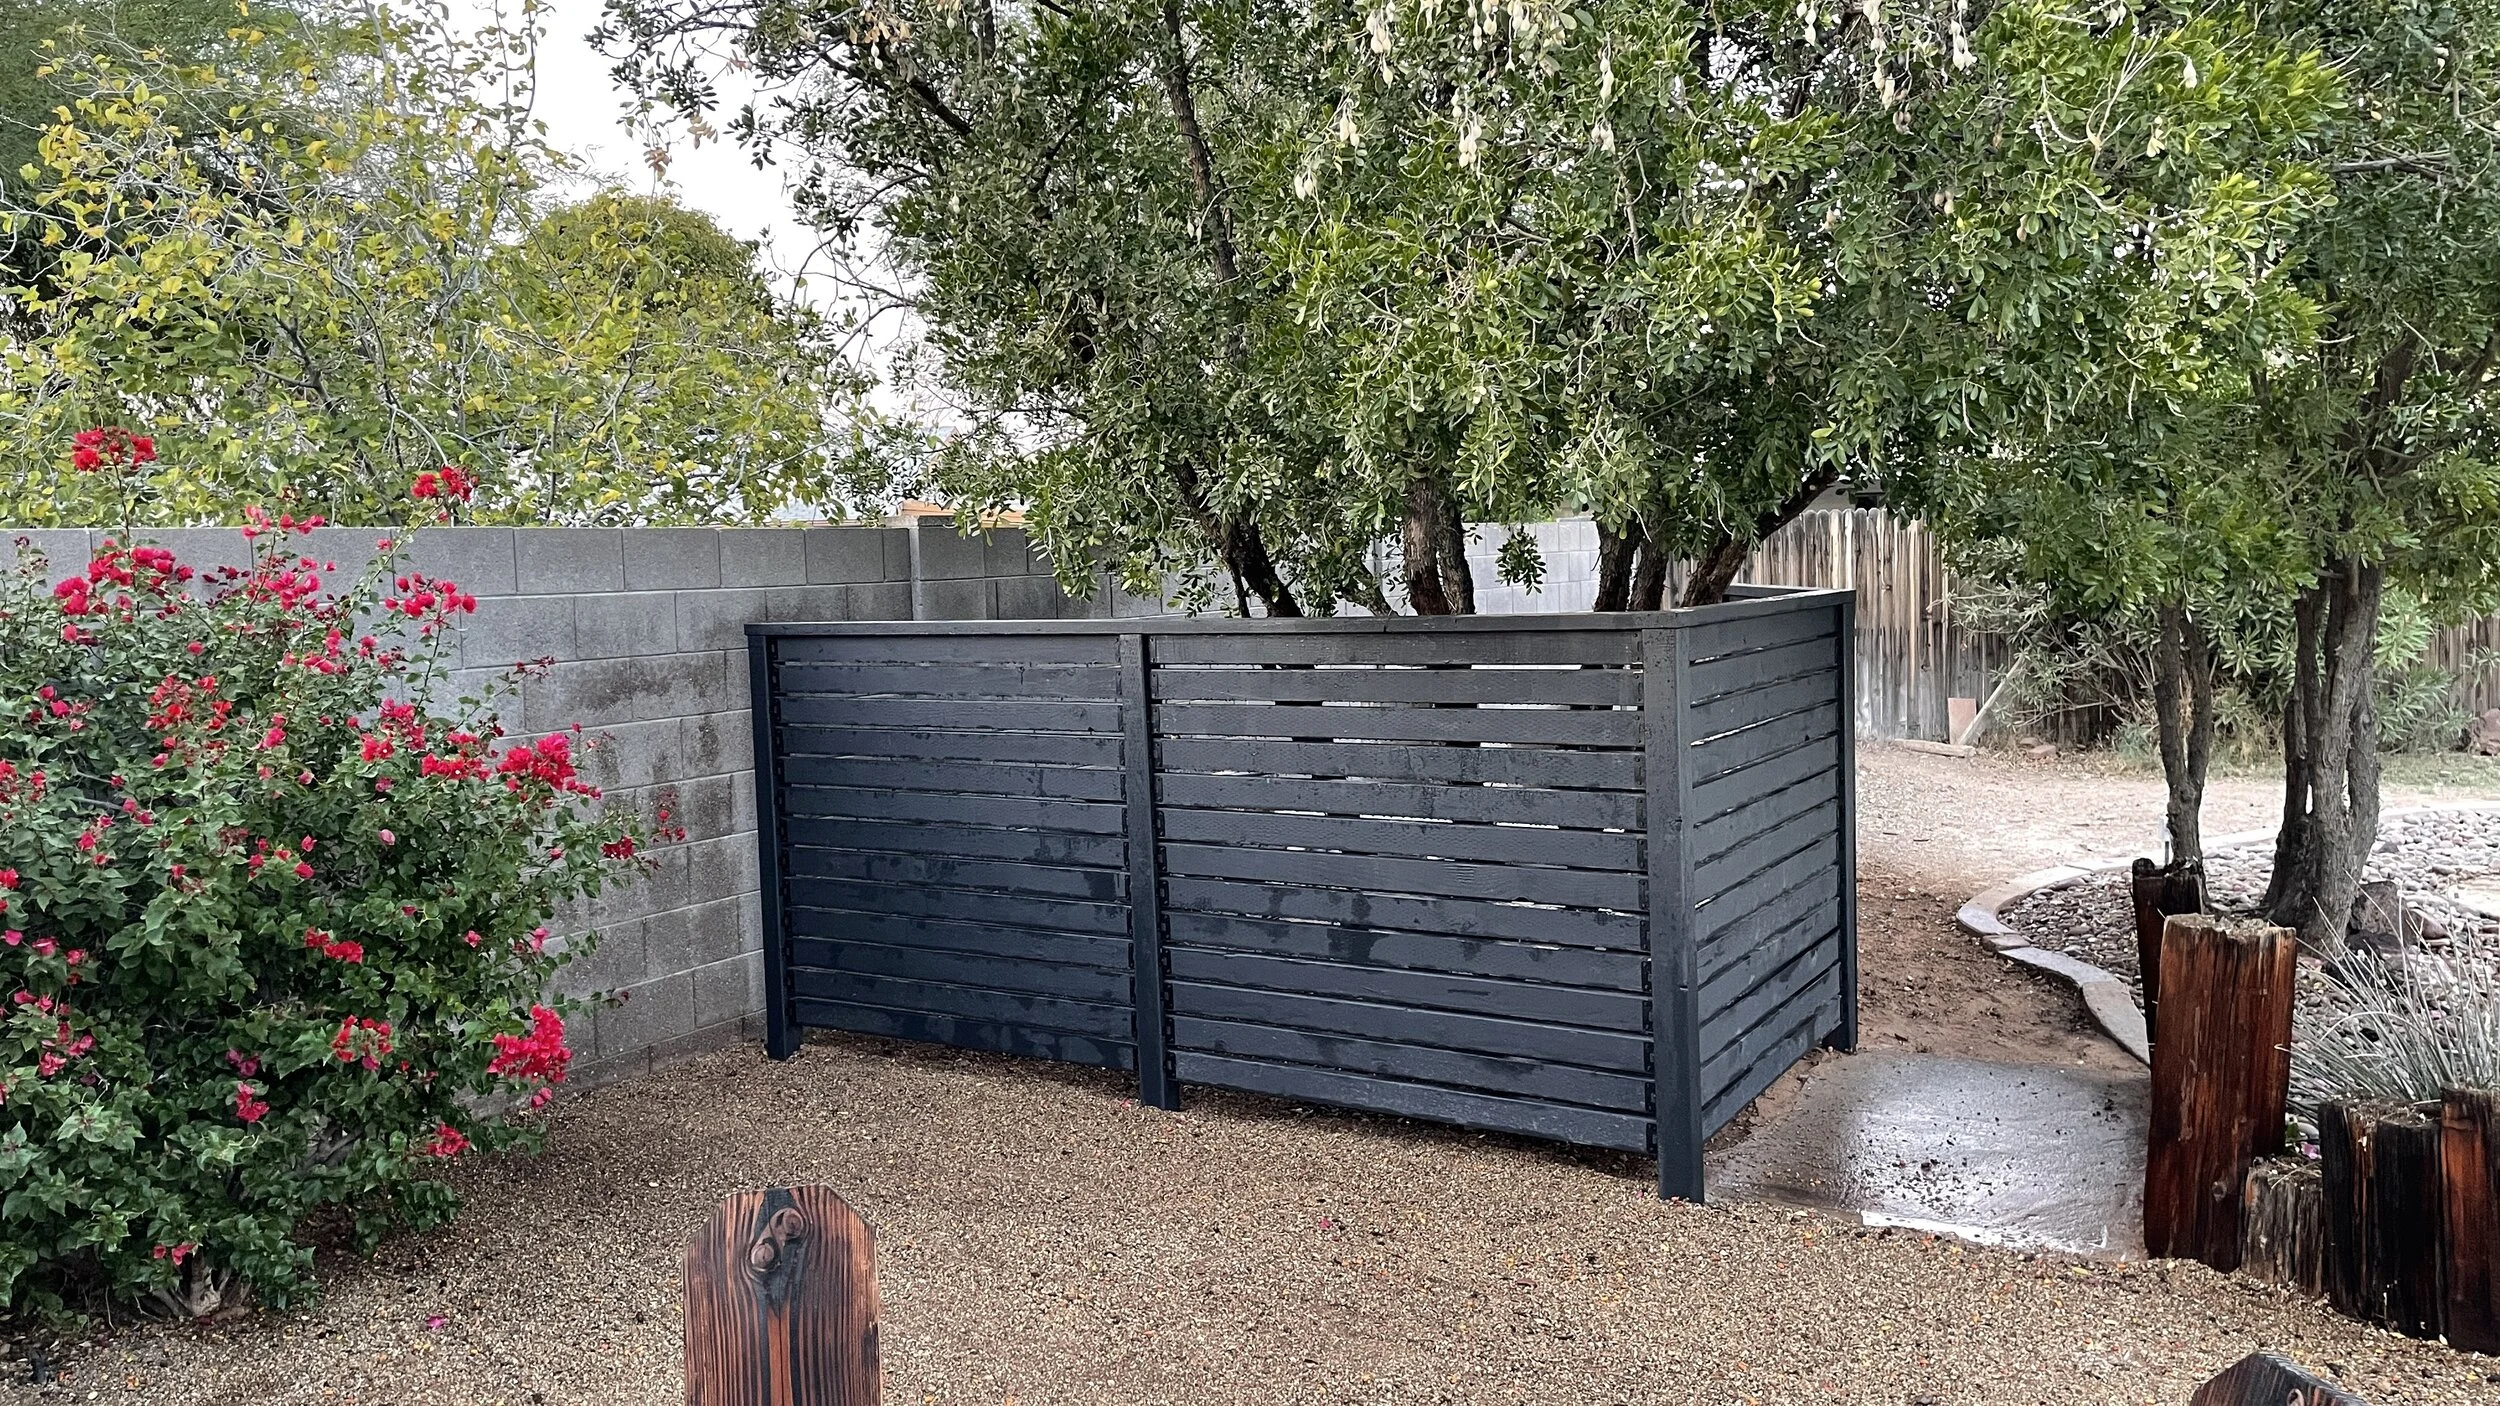
And here is my AWESOME DIY Modern Privacy Fence! It hides the pool equipment so well and adds so much character to my backyard. It is funny with the black paint I find that the fence blends in and stands out at the same time in a totally AWESOME way!

Oh yeah! I love it… what do you think? My DIY Privacy Fence.
So what do you think of my new privacy fence? I absolutely love it!
Thank you for following my building journey… remember Build LOUD, Build WILD and have an AWESOME day!
-Sadie Mae