

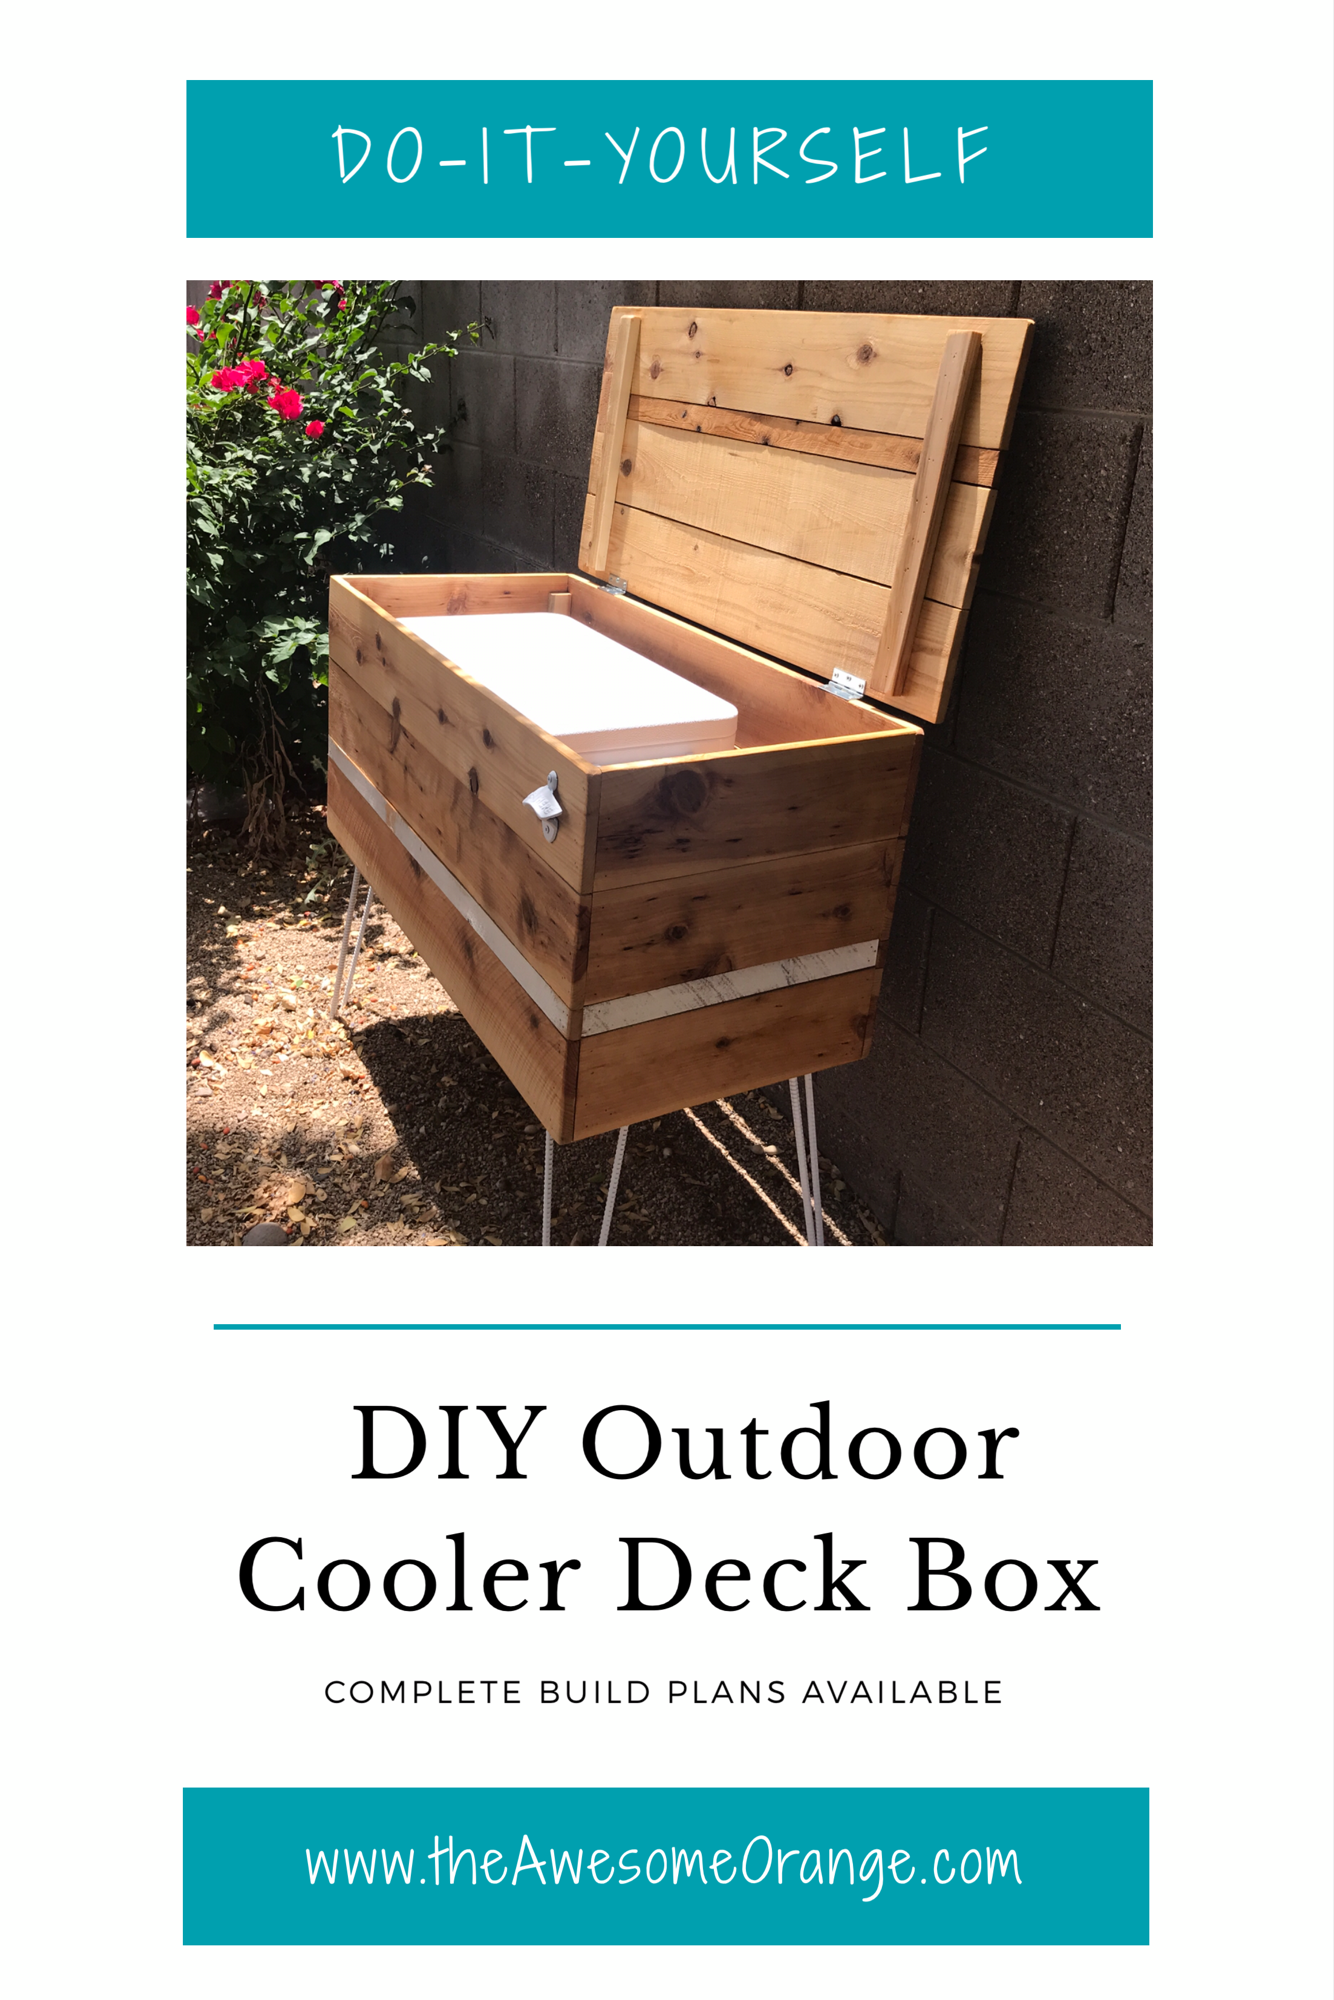
DIY Outdoor Cooler Deck Box
I’ve teamed up with a group of other blogger for another challenge this month. This time the theme is DIY Outdoor…. so of course I wanted to make something else for my soon-to-be new patio!!! This time I choose a DIY Outdoor Cooler Deck Box. Within the last year I had to retire my first build ever, see it here…. so I needed some place for hidden storage. Someplace to maybe hide a cooler? or some pillows? or charcoal? However I end up using it most all I know is that it has to look cute.
This post is NOT sponsored. This post does contain affiliate links.
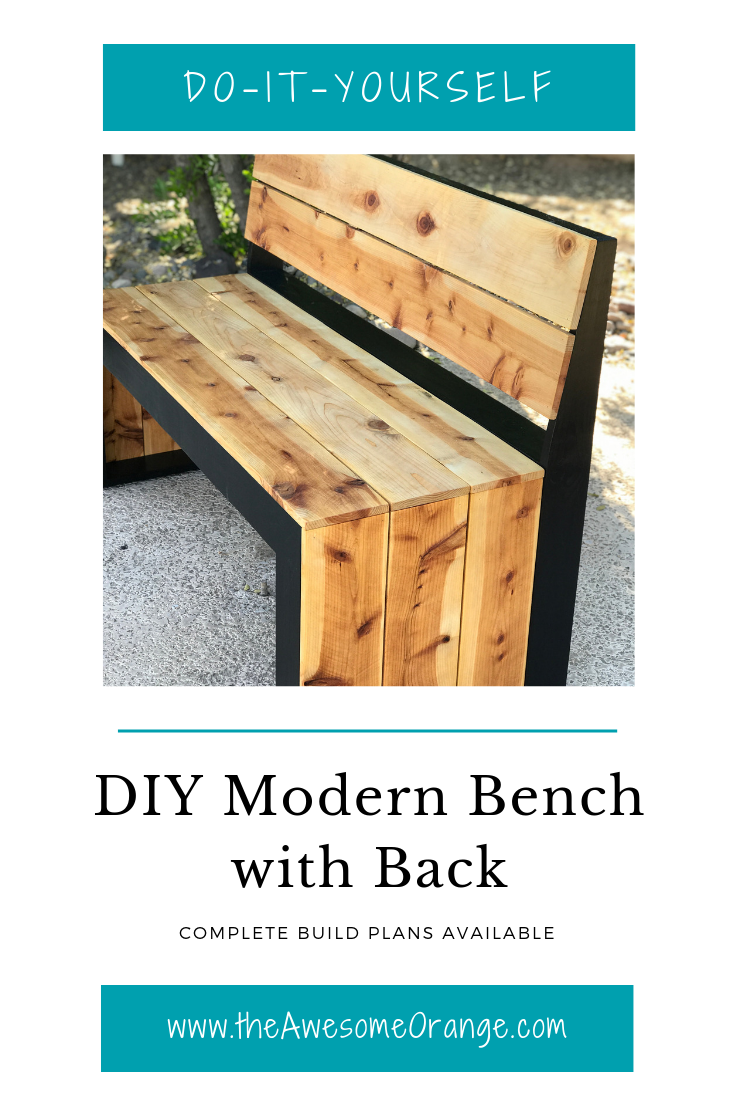
I usually try and start projects by looking around and seeing if I can use some materials I already have on hand, because I tend to collect a lot that I can’t seem to get rid of. You know for that one project that I might make 10 years down the road! Ha! Well, for this build I came across some 16” rebar hairpin legs that I had a friend of mine make me (2 years ago) when he was making some legs for a different build… because you always need metal legs on hand. Once I knew I wanted to use those, then the rest of the design came easy. Its outside, so I’ll use cedar fence pickets again and have it match my new DIY Modern Bench with Back and my DIY Outdoor Tic-Tac-Toe Game. I also had some old fence pickets on hand that were already painted white from an old market backdrop I used twice, so I thought I would add those in and that is where the stripes came from.

This build is super easy and you only need a couple of tools to build it….. well if you do the cedar stripes like I did you will need a table saw. But you could always use 1x2’s precut from the store or just completely get rid of the stripes and just use three of the fence pickets. Either way it will be AWESOME!
So lets it started making you your own DIY Outdoor Cooler Deck Box!
You can get downloadable plans here that include Shopping List, Materials List and Cut List.
Sorry I don’t have a ton of photos of this build, but I did video everything and have a YouTube video below documenting the process!
Step 1
Cut 1x4’s to size and assemble inside base of box using wood glue and 1 1/4” screws, preferably rated for exterior use.
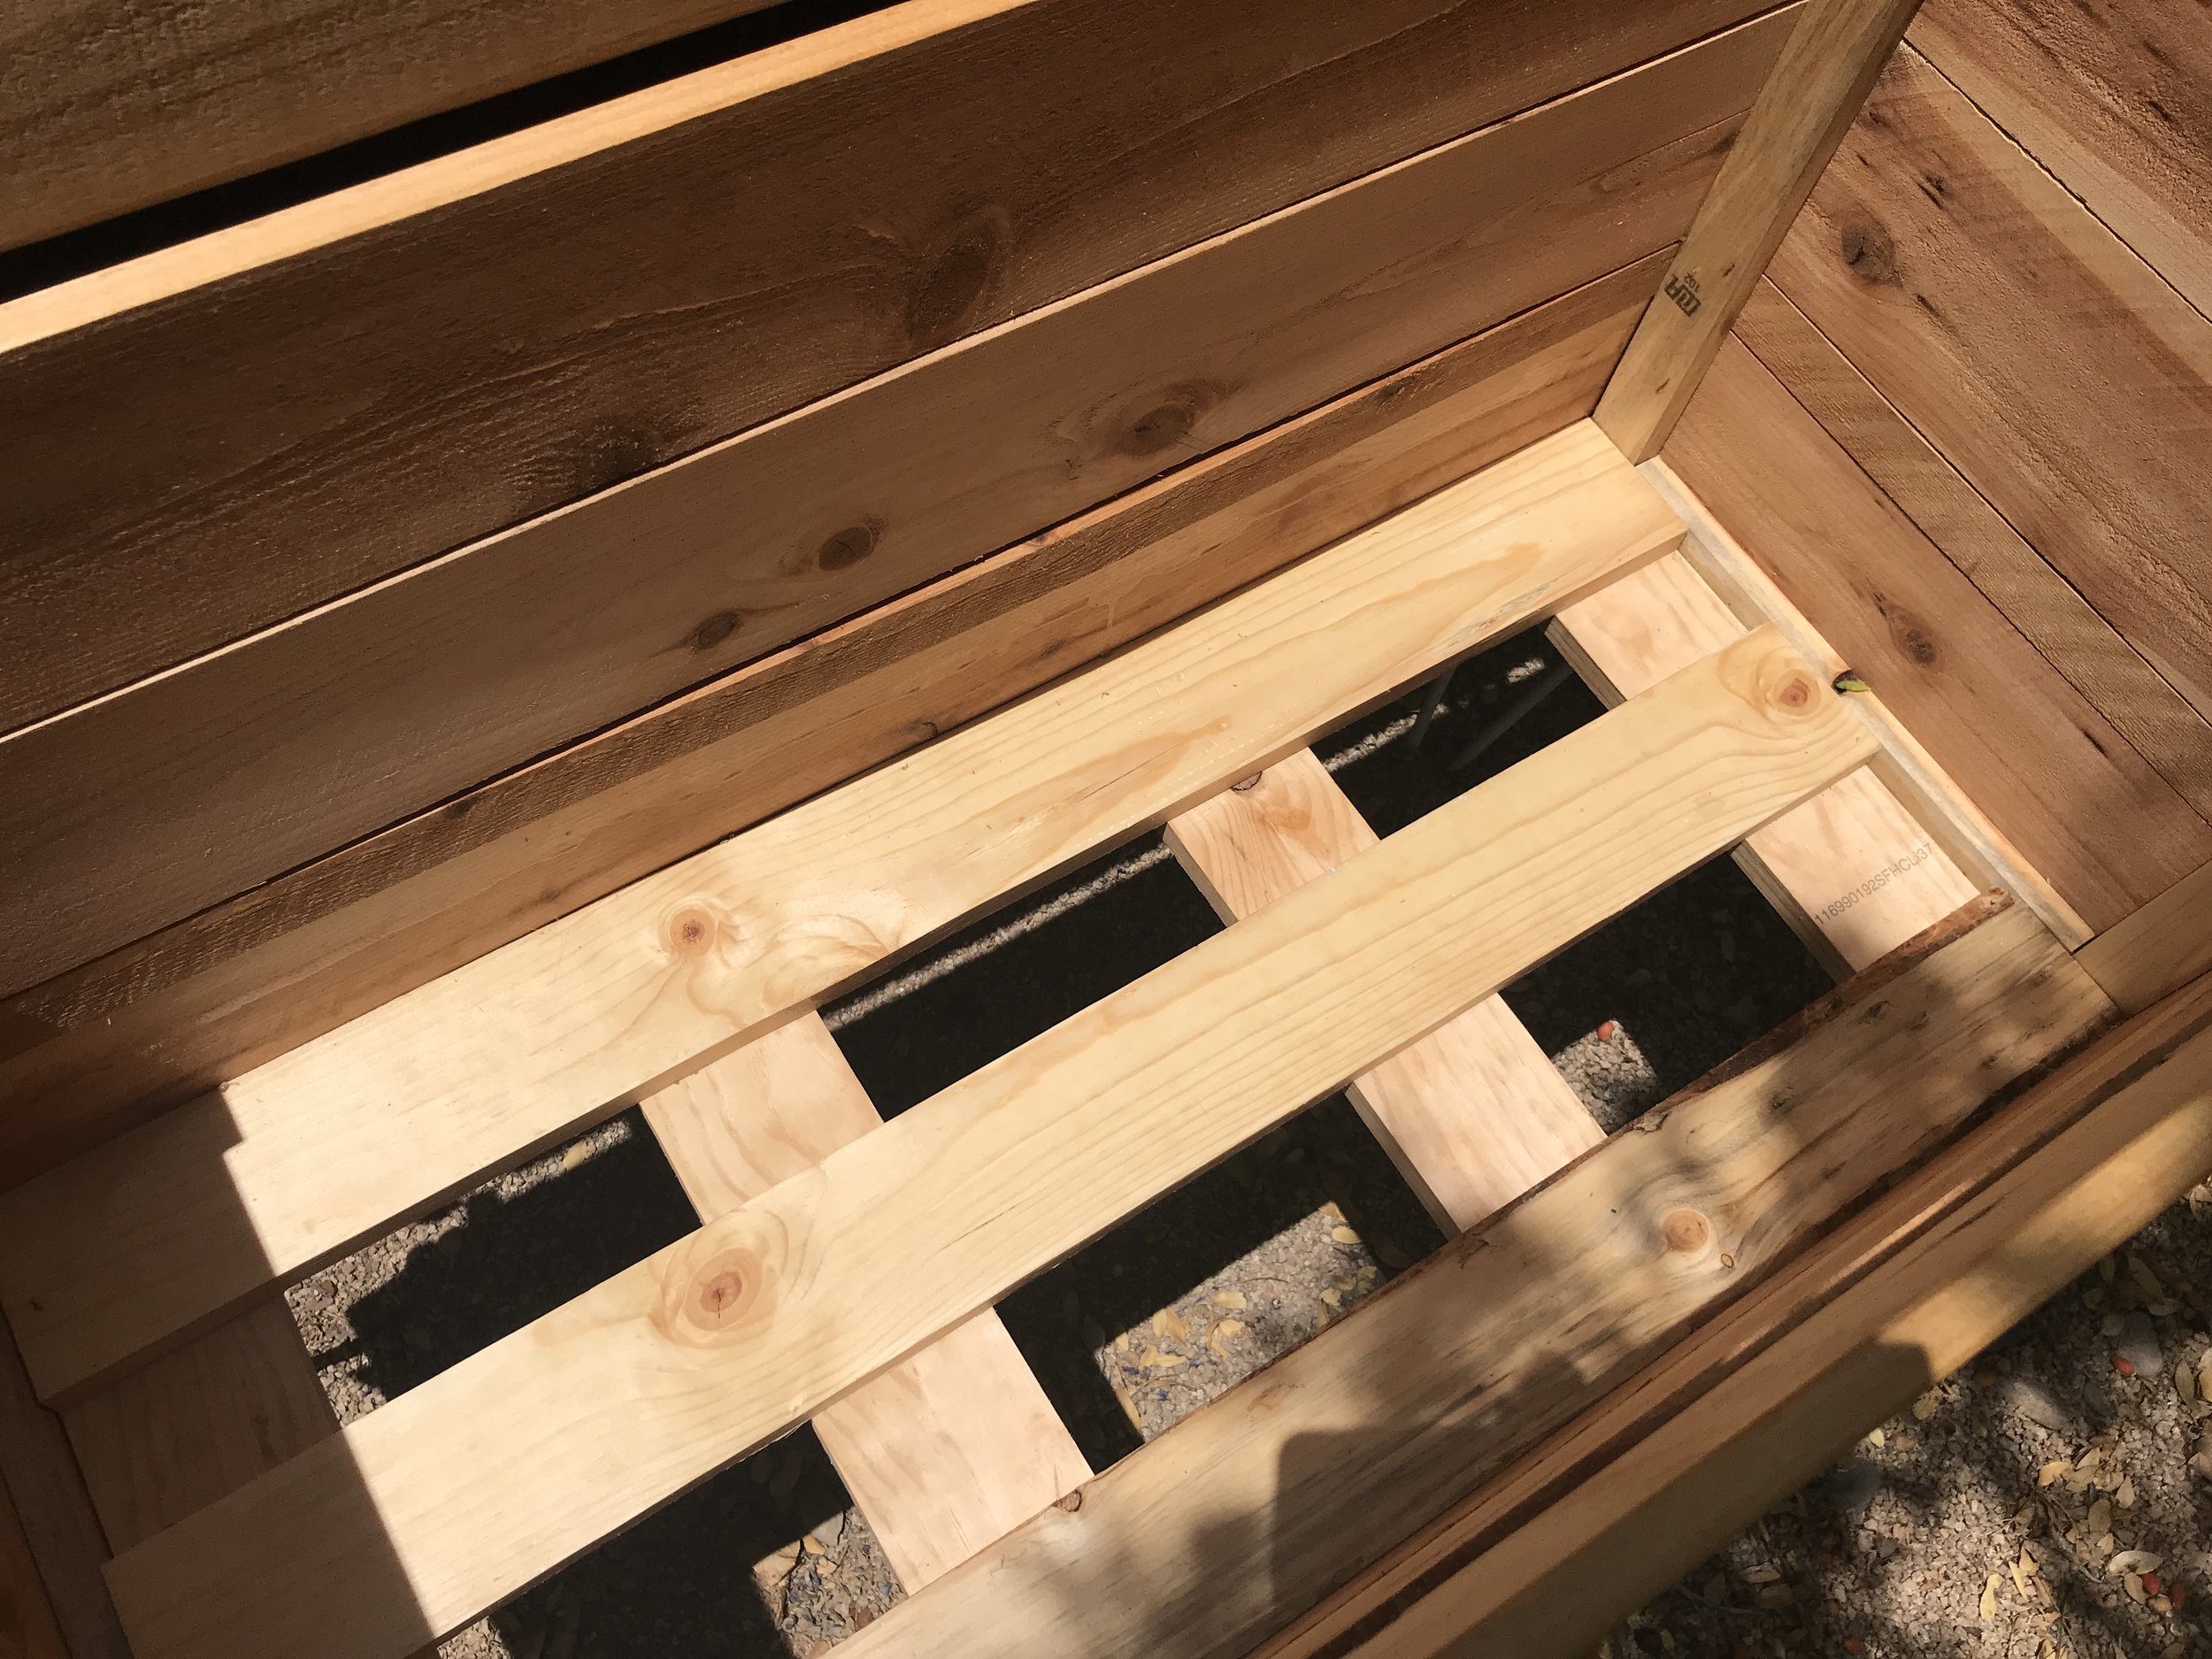
I built the base out of 1x4’s for a few reasons… they are stronger than the cedar fence pickets and they are a stand 3/4” thick which means I can use normal screws (1 1/4”) I have on hand. This will be the main support for the cooler and what we will be screwing the legs to down the road. So the rest of the box is really just for show. You might be wondering why I didn’t make the bottom solid… well I did that so if you have a cooler in there and need to drain it you don’t have to take the whole thing out you can drain it in place. Plus, it isn’t as inviting for spiders and bugs and whatever to want to live in there.
Step 2
Assemble side panels using wood glue and 1 1/4” 18ga brad nails. Be sure to line up the 1x2 to the side edge of the cedar planks and also to the bottom edge of the cedar planks. One 1x2 on each end of the panels. Then add the bottom 1x2 x13 1/2” flush to the bottom edge. This will give you something to help nail everything together later. NOTE: you can nail thru the 1x2 into the cedar to avoid visible nail holes in the cedar.

Step 3
Attach side panels to the 1x4 base of box using wood glue and 2” 18ga brad nails. Yes sure to make sure these are as square as possible when installing. You might need to use a clamp or a second set of hands to hold everything together when attaching.

Step 4
Attach front and back side slats to box using wood glue and the 2” brad nails. Be sure to nail into the thicker point of the connection to get a nice fit and to ensure no brad nails stick out the wood. You most likely will need to help the wood to get it to square up. Don’t worry if everything isn’t perfect now, you can sand everything later flush.

Step 5
Assemble lid using wood glue and 1 1/4” 18ga brad nails. Inset the 1x2’s from the ends a couple of inches and make sure that they are centered, so that when the lid is lowered onto the piece the 1x2’s will fit snug in the opening.

Step 6
Attach lid to box using 2 - 2 1/2” narrow utility hinges. Make sure to space these inside where they won’t interfere with the lid supports or approximately 5-6 inches from the ends.

Step 7
Finish as desired. I sanded my piece to 120 grit and then put two coats of General Finishes Outdoor Oil on it. I also spray painted the legs, handle, bottle opener and screws in a matte white paint.

Step 8
Attach legs, handle and bottle opener. Use appropriate screws based on legs and hardware. Be sure they aren’t too long to go thru the thin 5/8” cedar material.

My top already warped a little in the sun, but that is why I build rustic furniture for outdoors!
And viola… you have an AWESOME DIY Outdoor Cooler Deck Box. Oh, I also found the white Coleman 48qt cooler on sale at Home Depot for $19.97!! So all in all this build cost me about $100:
Cooler - $20
Wood - $37
Hardware - $12 (Hinges, Pull, Bottle Opener)
Legs - FREE but you can get some similar here for $29
I love how it is a little bit rustic and a little bit modern, two of my favorite styles! This was such a fun piece to make and I can’t wait to get the patio finished so we can start using it on a regular bases! And I can get some better pictures of it in action!
Wanna make one for yourself? I have downloaded plans here that include Shopping List, Materials List, Cut List and 2D graphics. If you do make one, I’d love to see it so please tag me in your work!
Can Make It Now?
Pin It and Save it For Later!
Oh and be sure to check out all the other DIY Outdoor projects from my blogger friends and you will have your outdoor space ready for summer in no time!!!
Addicted 2 DIY -DIY Pool Towel Rack
Remodela Casa - DIY Outdoor Coffee Table with Planter
Jaime Costiglio - DIY Brass and Wood Outdoor Planters
The Created Home - DIY Outdoor Chandelier
Anika’s DIY Life - DIY Outdoor Dining Table
The Inspired Workshop - DIY Outdoor Window Shutters
DIY Huntress - DIY Modern Planter with Hose Storage
My Love 2 Create - DIY Porch Planters
My Repurposed Life - Gas meter Cover Outdoor Eyesore
Ugly Duckling House - DIY Outdoor Corner Table
House Becoming Home - DIY Chippendale Planter
Joyful Derivatives - DIY Cedar Window Boxes
Thank you for being a part of #TRIBEAWESOMEORANGE. Keep #BuildingAwesome AND have an AWESOME day!
-Sadie Mae


